
Gah, Again with this photographic neediness! 🙂


Gah, Again with this photographic neediness! 🙂

I’ve been shooting video with my 7D ever since I got one from the Marianne-shoot. But as with most people, there are a few things that have always bothered me with Canons stock-firmware. And it’s been ignored so far by their development team (in order to, it seems, protect their video-departments).
Enter Magic Lantern.
A firmware add-on that has been releasing the full power of Canon Cameras since the first hacks of the 5DmII. As of a couple of weeks ago the 7D’s infrastructure has been deemed unhackable by the developers because of the dual Digic CPU-system employed by Canon. But then, suddenly. Seemingly from out of nowhere. A user named g3gg0 posted that he cracked the code. And now… an Alpha firmware add-on is released.
If you’re wondering why I keep calling it a firmware add-on, well. It’s because it is. In order to use it. You have to update canons firmware to v2.0.3 and then load a file-structure into your CF-card and then for each time you power up the camera, you go into the menu and do the update again with the modified .fir file. This won’t actually write anything new to the cameras firmware-flash-memory. Instead it’s just a way for ML to launch it’s code into RAM. For more details about that… look up the site: http://www.magiclantern.fm/whats-new/104-releases/140-first-7d-alpha-released
Why am I excited? Well. Because, even while it is a limited feature release. It still has two of the main draws for me of the ML features. 1: Custom Crop-Marks and 2: Live View Contrast and Saturation adjustments.
I’ll explain:
Then I installed Magic Lantern. It has the ability to load custom BMP files as cropmarks. And while the ones provided did have Scope variations. I wasn’t all happy with how they were made. Luckily at ML there’s guides how to make functional BMP-files yourself and following those guides I made a set of crop-marks that has solid blacks outside of what I want to frame. This lets me concentrate fully on what I’m filming and ignore everything outside of it. Because I’ll just crop it out later.
Added bonus: In the menu there’s the ability to show the cropmark in playback. I’m so happy! And it’s properly adjusted to match up with the playbacks vertical offset too! Wee!
I have however noticed that a few times. The cropmark won’t go back to proper vertical position when switched back to recording mode. But re-launching the cropmark usually remedies this.
So in ML there’s a feature that allows us to adjust the contrast and saturation of the live-view feed. This means that we’ll get to see the image with more contrast and still shoot with the gradeable Cinestyle without having to switch between them all the time.
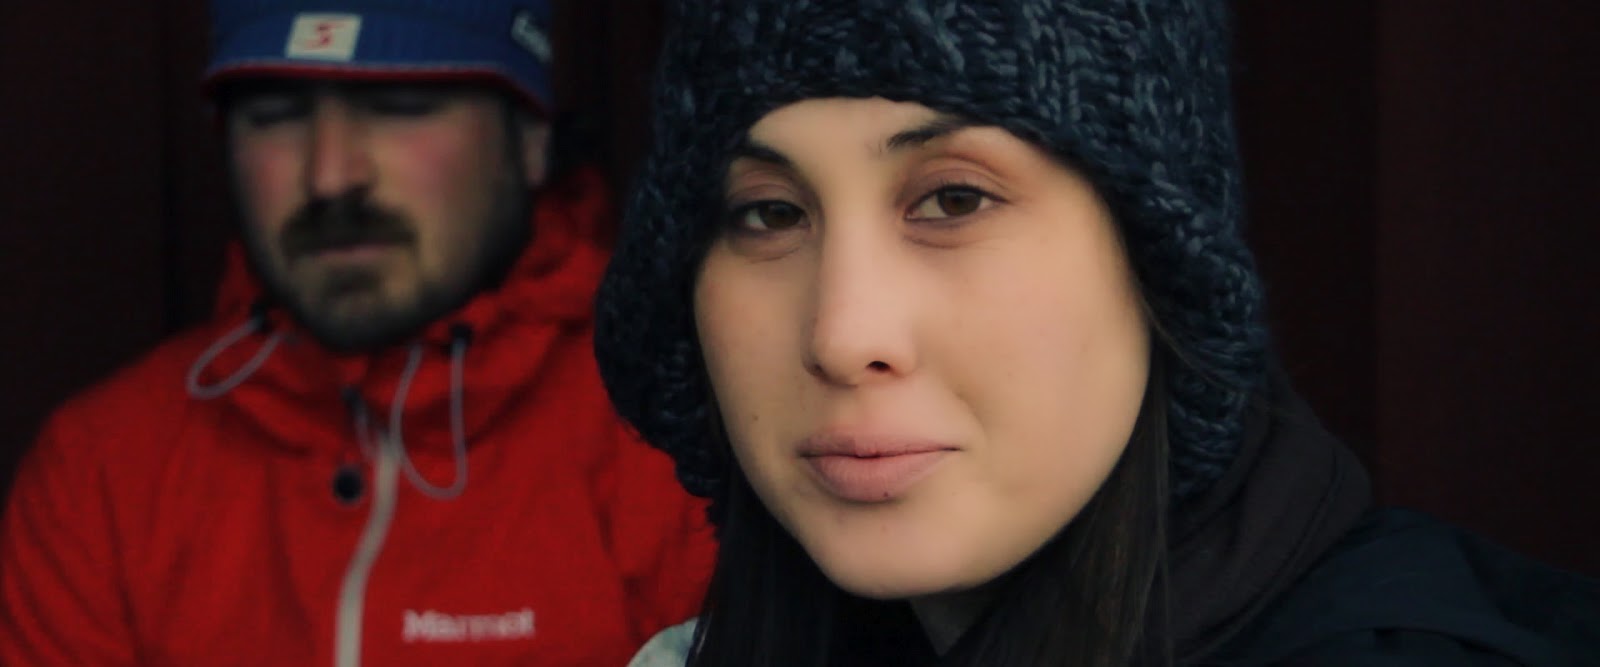
As I mentioned earlier. I have been not just a tiny bit impressed with what the NEAT denoiser can do for video. And looking through some footage I had in the archives I decided to see what I could do to make the, in many ways horribly shot, footage look a bit nicer. And the choice finally fell upon a clip I had shot almost at midnight here in the jamtlandish forest while a team from SyFy where here to try to find our own little loch ness monster.
It’s in the land of the midnight sun, but still, I had only the f3.6-f6.5 zoom-lens and of course, the people where sitting in the shadow to not interfere with the filming that took place all around. So, since I have sworn to the allmighty noodily lord and his midgits that I would never use any shutter wider than 180 degrees I ended up shooting with very high ISO-gain on the 7D-sensor. And also, of course, the Technicolor CineStyle picture-style was brand-spanking-new so I was trying out that too.
All this meaning some great noise. 🙂
Anways… This is what I started out with.

Might not look so bad. But then again. Cropping to scope does tend to make most videos more cinematic, regardless of content (sarcasm). But nontheless. There are some pretty big issues abound in the image that even me with my simplistic monitor can spot.


First off. She’s blue… almost purple. And while there are a lot of Navi-fans out there I doubt they are enough to warrant me leaving her looking like an alien. So I had to focus on getting the skin-tones right. So after giving it the simple Neat-video with my noise-profile I had lying around and a slight sharpening on the Luminance I set to work.

The difference is slight. But if you pull it up to bigger view you will see that there’s some serious noise in the raw pic’s red jacket and in the image overall. And if I don’t pull out that noise right now it will only look worse when I’m pushing the colors around. As I will be doing rather severely.

So I drop in my trusty Colorista II and in the primary I simply ctrl-pick a part of the jackets white part as white-balance. That’s it. For starters I just want it neutralized. This was the “color-correction” bit of the process. Now let’s get “artistic”.

Since the skintones has actually started to look like skin with the simple adjustment I go in and do a simple warm-highlights and cool shadows-type of look in the master-section of Colorista.
 Oddly enough. I rarely do this by actually touching the wheel for “shadows”. Because that tends to darken down the shadows far too much and tint the whole shot in the wrong way. Instead I go for the midtones. And I know this sounds crazy. Since this is where skintones is supposed to live. But if you look at the talent. Her skin is actually probably already some of the brightest parts of the image. Sometimes this reverse-tactic does backfire. But the result is still a standard push-pull to get it to look great. And while I’m at it I go into the curve-editor to bring in a custom contrast-curve.

A lot better. But still. Let’s do what I’ve been told women spend a lot of their time doing when they expect to be seen by a lot of people. I myself don’t think it’s always necessary. But hey. I’m practicing a little hollywood-style right now, so let’s go a bit shallow with what’s considered beautiful. Just for practice… ok.
So here’s where I found de-noising to really help out while grading. For comparison I took two screen-shots of using the same key sample-area on the same footage with and without the de-noising beforehand:


Now, while the un-de-noised version is useable if you do some blurring of the key it does feel rather wasteful and you are loosing a bit of definition of the edges in the process. So in my mind the denoised one is a clear winner. But then in this example I did end up blurring it allthewhile but I hope you see the potential here.
So back on topic here. Using a rather wide sample of the skin I got a nice key and went ahead to warm it up a bit further while also adding in a negative pop to even out her skin a bit and topping it off with a slight rasing in exposure. Since the key keeps the negative pop and warming where it should be without interfering with the details in the eyes and lips, I can be a bit agressive with those adjustments. -55 on the pop is probably a bit heavy-handed. But heh… it it’s already rendered… So what am I supposed to do? And it doesn’t seem to bother the guy in the back even.
 |
| (adding a negative doesn’t that result in zero?!) |

Then, I felt rather done with her. But the red jacket in the background did feel a bit obtrusive. So on a second adjustment-layer I added another colorista and went into its secondary keyer. Sampled the red jacket. And just pulled down its saturation and brightness a bit.

And while I was just about to call it done I found myself looking at the lips. And I wondered. Could I maybe do digital lipstick? It sounded a bit off. But I’m not one to shy away from what’s supposed to be stupid. So I simply added another adjustment layer and another colorista. This time with a big power-mask (the first time I used the powermask-feature in this “project”) over the lip-area. A simple key and color-adjustment later and suddenly she had a not too tasteless adding of lip-pigmentation (anyone who’s actually knowledgeable about makeup probably disagrees with my wording and estethics. But at least I tried. 🙂 )

So in closing, don’t let me forget what the title was. Because now I’ve gone from this:
To this:
Without it ending up looking like this:

The difference might be slight. And probably even neglibe on the web as youtube and such. But trust me, in motion. You will be glad to not see that noise dance around, distracting you eyes from what’s important in the scene (I spent two hours in Oldenburg looking at grain-structure btw. It was booooooring… and the film wasn’t great either).
Here’s to the next english-language blog entry!
Cheerioh!
–

Off course, The first thing I would do is a 3D-track with some extruded text… I’m sorry okay!
Out of the blue in the days of NAB we get rumors from Canon Rumors that the 7D will possibly be getting an “extensive” firmware upgrade. Since Canon and most other manufacturers has so far mostly treated firmwares as spelling-error-fixes (and fucking with hackers-upgrades) I’m not convinced about anything until we see the final outcome. But as the mill starts churning I’ll throw in my own suggestions in this here blog that no-one reads anyways.
Things I would like to see in a firmware update for the Canon 7D that rarely, if ever gets any mention (in no particular order):
I’m sure I come up with more as time goes on. But of course, I wouldn’t be mad at them if they implemented in-camera ProRes 4:4:4 too. 🙂
For now, we’ll all just wait and see.
Oh and PS…
Stop worrying about hackers customizing firmwares… if it bricks… then just refuse to fix it under the warranty. Let them do some crazy things. We will all benefit and you’ll sell more cameras. 🙂
DS


 Men ok, det är inte min super8 film den här gången. Jag var riktigt jävla sjuk när rullarna delades ut och jag hade inte riktigt någon idé att filma i tid ändå. Så istället fick jag agera aktör samt teknisk rådgivare i Sulaymans noir-thriller. Inspelat på svartvitt Kodak TriX blev det och som teknisk rådgivare fick jag väldigt mycket svängrum att leka Director of Photography genom ljussättningen. Vilket var en väldigt intressant uppgift.
Som vanligt är det nu dock en ordentlig mängd osäkerhet om hur filmen exponerades. Jag har inte riktigt kunnat lova att det blir något annat än just "Noir", som i översättningen "svart". Men så är det när man tar sig lite vatten över huvudet. för varje nytt projekt.

Något jag också gjorde var att fota en hel del stillbilder som, som sig bör, gjordes i kontrastrik svartvit med stundvis väldigt grovkornig redigering. Alltifrån Tony Bergslids eminenta spel av en luffare som kommit över lite väl mycket pengar till TeamFX’s vapenarsenal fick jag bilder på. Riktigt spännande återigen att se sen när filmen kommit tillbaka från framkallningen i maj ungefär.


One of those times I wish I had gotten the timelapse-thingamajigg a lot sooner.
So I recently got my Chinese intervalometer for my Canon 7D and just as I was going to test it out, I started to think about what I wanted it to do. Or rather, how to calculate what I want. At what interval should I set it if I wanted a particular effect? So off I went to the trusted knowledge-source called Google knowing fully well that if it doesn’t show up there, it doesn’t exist. Or something like that.
I did find a couple of solutions, most of them centered around using the Iphone as a host. Now, I have been quite outspoken about my apple-policy, and therefore those were not for me. I can see the utility of that sort of an “app” (in my days we called them “programs”) but I just don’t trust a company that don’t know how to hold a mobile phone…
So I found three alternatives:
At first glance it seems to have what I want, but trying it out, I wasn’t impressed, no 24fps playback setting, and the intervals often end up being decimals per second. Meaning that it’ll say .5 times per second meaning 2 seconds per frame. This gets confusing fast when it says 0.0056 frames per second and your equipment asks for seconds per frame.
A web-based solution for iphones, which makes it useful for all platforms supporting html too. But again, the functionality isn’t what I’m after. It only calculates two of the three variables of time-lapse. Either the event time or the playback time when what I want to find out is the Interval, the actual number I need to enter into my intervalometer.
The Steele Chart. By far the best calculator I found for this type of things. At least when working in 24fps-formats. I printed it out and put it in my camera bag/backpack as soon as I read and understood the workings of it. But still I wasn’t satisfied.
So I read the text in the bottom right corner of the Steele Chart and realized that the mathematics was actually quite simple:
FORMULA: Event duration in seconds divided by screen time in frames
equals the interval.
Then I went about and created an OpenOffice-calc-sheet (equivalent of an Excel-Sheet) that did exactly what I wanted. Sure it’s not perfect, and I’d be the first one to say that it’s ugly-looking. But it does do it. You enter the event time, the desired playback-runtime and top it off with an fps of your choosing. And through the wizardry of these sheets, it automatically returns a number that is intelligible for both you and your intervalometer.
(EDIT 2021-04-06: Apparently, I have misplaced these files… So the links have ended up becoming broken. Sorry about that. The Google Sites thing was a solution I had forgotten long about and now it’s gone)
As a bonus I added a couple of features to calculate other aspects of the timelapse. By adding the information of the average file-sizes of your RAW’s and JPEG’s you can see how much space the resulting stack of photo’s will occupy on your memory-card. And adding the free space on the card, you get the number of possible shots. Also, of course it calculates the X-speed if that’s your thing.
The usage is fairly straight-forward. You put in the information needed for the calculations in the orange cells and the results appear in the blue cells when you commit the numbers entered.
Of course, it has it’s drawbacks too. For one thing, you need a .odt-viewer in order to use it, that means either a tricked out phone or a laptop for field use. Also, it calculate that one variable only. But since I made this mostly for my own use I sort of customized it to my needs and the equipment I use.
It was an interesting excersize that I thought others would like to have access to or improve and maybe make it a bit more user-friendly and platform-independent.
But until next time! (nature is calling as they say…)
 |
| 18 mm |
 |
| 270 mm |
 |
| Min stökiga lägenhet. |

 För det första så är visserligen zoomen helt mekanisk, inga servo-motorer som ställer till det med 70tals-crash-zoomningarna. Men däremot uppför sig bländaren lite underligt för oss videofotografer. Man kan nämligen höra den justeras i fasta steg från helt utzoomad till helt inzoomad. Det kan verka konstigt när bländartalet inte ändras i displayen. Dock har jag en teori om att iochmed att linsen blir längre så ökas bländartalet, kanske åker bländaren längre ifrån sensorn, vad vet jag? Och för att kompensera det ökade avståndet så öppnas bländaren ännu mer. Det är en intressant lösning som jag undrar om den också finns i andra linser och videokameror. Men problemet är inte så mycket det som att det görs i fasta steg. Det gör att luminansen i videon ser ut att hoppa till några gånger från helt in till utzoom och tillbaka.
  |
| Bokkake-någon? |


 Sen bar det iväg ut på föräldragården igen och där skulle det rullas rundbalar. Och medan man väntar på att vagnen ska fyllas till bredden med hoprullat foder så ser jag det gamla vindkraftverks-projektet mot den klarblå himlen. Kameran åker åter fram.


Sen skulle jag vilja slå ett slag för att underexponera och fel-vitbalansera bilder. Är det korrekt? inte för fem öre, men det är något med de här bilderna som gör att jag tror dom inte skulle vara alls lika intressanta om jag vitbalansera enligt regelboken. Att ladugården jag fotade i ser ut som stundvis som en grotta är bara ett plus också.


Ögnade igenom senaste tidens bilder och såg lite olika jag kände för att besvära allmänheten med. Det finns lite av allt möjligt. Först från en locationscout-trip innan Marianne-inspelningen satte igång på allvar. Karln i sista bilden där är regissören som dragit ihop hela produktionen.


Sedan var detett par bilder på en lampa som jag tyckte sken så skönt. Visst är vitbalansen åt helvete fel, men utan den värmen blir bilden tämligen tam i dessa fall.


Sen till sist några bilder från idag då jag var ute och plöjde åker på familjegården. Denna åker är alldeles ut mot Storsjön. Och med det strålande vädret och nästan spegelblanka vattnet var det alldeles för svårt att inte skutta ur traktorn och ta lite bilder.


Så det var allt för denna gång… synes!

Tiden går och inget består eller något sådant. Lite saker har man att skriva om.
Till att börja med, långfilmsfotograf-ryktet verkar bestå. En vecka från första stora inspelningsperiodens två veckor och jag har inte hört att jag är kickad eller något. Lite ovant känns det med ett så stort åtagande på ingång som en kinesisk Volvo-lastbil dundrande på motorväg mot en förvirrad gnagare.
Sen har ju stillbildsfotandet också fortsatt med kameran som jag fått ut iochmed den ovan nämnda inspelningen. Fortfarande inte min egentligen. Men regissör/producent/manusförfattaren har generöst låtit mig använda den före starten för självständig inskolnings skull.
inom ramen för dessa tester fick jag även igår äntligen chansen att få till en hyffsad bild på månen när alla tillfälligheter nu till slut gick min väg. Det är bilden ovan, en så-kallad full-size crop. Med det menar jag att jag tog bilden med Canon EOS 7D kopplad till min zoom-lins som i sitt längsta läge ligger på 200mm. Bilden som blir av det är visserligen så inzoomat jag bara kan få till det, men månen är fortfarande väldigt liten i bild. Så för att komma runt detta har jag helt enkelt beskurit bilden till lagom komponering och laddat upp här i sin pixel-för-pixel storlek.
Dock blev det inte så lätt att ta bilden som jag hade hoppats… för dels kan inte min lins riktigt fokusera på oändligt avstånd, eller iallafall inte på 384,403 km iallafall. Enda vägen runt det för mig var att sätta bländaren på så högt som möjligt, F32, och sedan kompensera med en slutare på 1/10 och ISO400. Med andra ord var även stativ och tidsutlösning nödvändig för att jag inte skulle skaka sönder exponeringen.

Är det optimalt? nädå, med oändlig budget hade jag nog valt en Canon 800mm lins. Men med lite finurlighet kan jag nog använda de exponeringar jag fick för kanske en compositbild i HD där källbilden använder en vidare lins. Det blir nog skarpt nog i det fallet och storleken blir nog imponerande än vad den skulle blivit med vidvinkeln.
Jaja, då slänger jag väl in två andra bilder jag tog utanför föräldrahemmet, första var bara lite underexponerad så det fixades i Photoshops RAW-verktyg, andra var nästan skrattretande dåligt exponerad. Många fler tricks tog jag till där men resultatet blev nog iallafall acceptabelt för webb-visning. Någon gång ska jag nog få till en bild jag får för mig att printa ut som affisch… jaja… men fram till dess hinner jag nog posta fler inlägg i min halvsovande blogg som ingen läser.

Å, jajustja… Fotobloggen min lägger jag ner helt. Allt sånt har förts över hit och bloggen kommer tas bort om några veckor.
Då slutar jag med en hälsning från en personlig favorit i år:
HUUUUUUUUUUYYYYYYYYY!!!!!!!!!!!!!!!!!


Som jag nämnde förut kan jag nog börja titulera mig som “DoP” snart. I samband med det fick jag ut ett exemplar av de beryktade Canon 7D-kamerorna just under den ökända dagen 1a april. Inga offer att fota dock så det blev en promenad ner på stan under påskveckan då man kastbytte mellan de gamla 70-80-talslinserna jag har sedan förut. Tre stycken gluggar med Nikon-fattning.
Lite o-ortodoxt, ja, jag vet. Men det var dom linserna jag hade som överhuvudtaget skulle gå att använda till kameran, medelst endast en adapterring från Scandinavian Photo.
En sak jag insåg snabbt var dock att jag antingen måste få tag i Canon-linser eller två till adapter-ringar. För det här med att lyfta runt min enda adapterring mellan gluggarna är ett tidsödande extra moment när man ser svanarna i fjärran göra sig redo att lyfta och jag själv ju har vidvinkeln med 0.66 adaptern på kameran.
Alla bilder tagna med RAW och gått igenom enklare färgkorrigering i konverteringsprocessen till jpeg-format. Ibland lite väl mycket gissar jag. Men på det stora hela är jag ganska nöjd med resultaten i dessa testbilder, Jag kan nog fota med 7D’n som stillbilldskamera också när jag inte använder den för video… Vem hade kunna tro’t?!
Förresten, har jag nämnt att undersidan av Frösöbron är fan underskattad rent visuellt?


